 listicle
7 Best Low Budget STEM Activities for Classrooms
Table of Contents
- Why Low Budget STEM Activities Matter in Today's Classrooms
- Quick Comparison: The Seven Activities at a Glance
- Activity 1: Paper Bridge Engineering Challenge
- Activity 2: Lemon Battery Circuit Experiment
- Activity 3: Homemade Slime Chemistry Project
- Activity 4: Paper Helicopter Drop Test
- Activity 5: Baking Soda Volcano Reaction
- Activity 6: Density Tower with Household Liquids
- Activity 7: Simple Bridge from Straws
- Bringing These Activities Into Your Classroom
- Frequently Asked Questions
Last Updated: October 18, 2026
Why Low Budget STEM Activities Matter in Today's Classrooms
Teachers nationwide face the same challenge: delivering engaging, hands-on STEM learning on tight budgets. The good news is that the most effective low budget STEM activities for classrooms need only materials you likely already have.
Low-budget STEM activities build the foundation for deeper learning. When students design, test, and iterate with simple materials, they develop problem-solving skills that transfer to every academic area.
The challenge isn't finding activities, it's finding ones that are genuinely classroom-ready, low-cost, and aligned to what your students need to learn.
Quick Comparison: The Seven Activities at a Glance
| Activity | Primary STEM Focus | Setup Time | Materials Cost | Best For | Cleanup Time |
|---|---|---|---|---|---|
| Paper Bridge | Engineering, structural design | 10 minutes | Under $5 | Grades 3-6, collaborative teams | 5 minutes |
| Lemon Battery | Circuits, electricity | 15 minutes | Under $3 | Grades 4-8, hands-on learners | 5 minutes |
| Homemade Slime | Chemistry, polymers | 15 minutes | Under $4 | Grades 2-5, sensory learners | 10 minutes |
| Paper Helicopter | Physics, aerodynamics | 10 minutes | Under $2 | Grades 2-6, quick wins | 3 minutes |
| Baking Soda Volcano | Chemical reactions | 20 minutes | Under $5 | Grades K-4, visual learners | 15 minutes |
| Density Tower | Physics, density concepts | 15 minutes | Under $4 | Grades 3-7, observation skills | 10 minutes |
| Simple Bridge from Straws | Engineering, structural stability | 12 minutes | Under $3 | Grades 2-5, fine motor skills | 5 minutes |
Activity 1: Paper Bridge Engineering Challenge
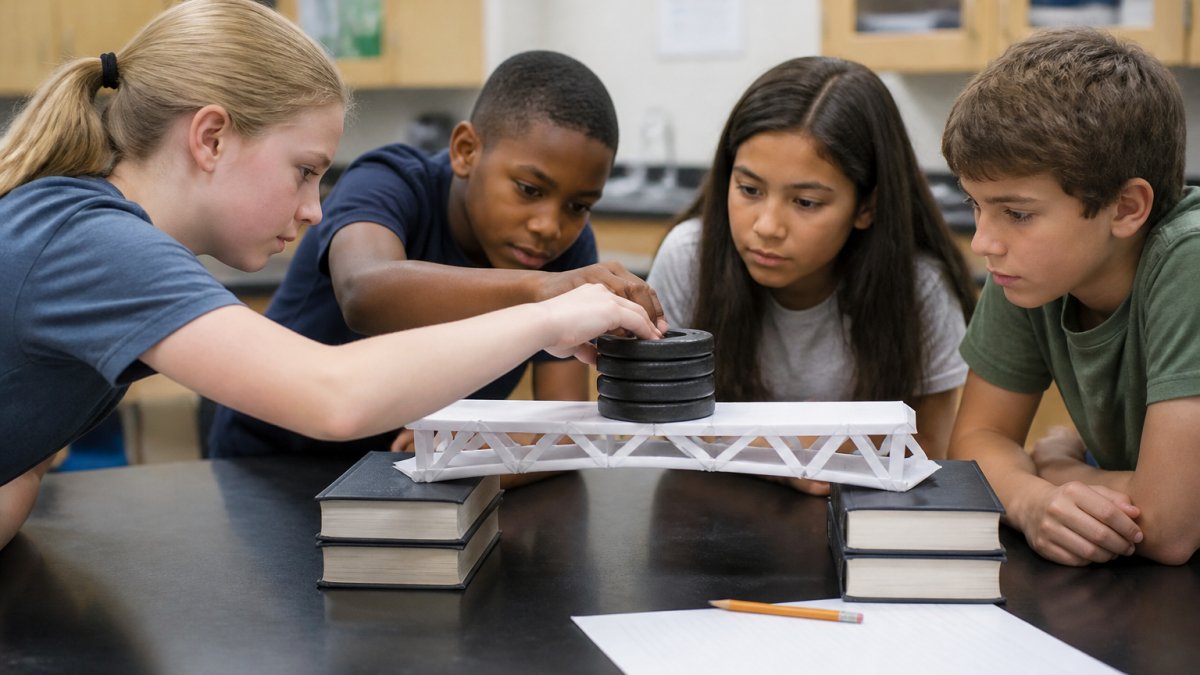
Students build a bridge from paper and test how much weight it holds before collapsing, teaching structural engineering, load distribution, and iteration.
What You'll Need:
- 8.5" x 11" white paper (5-10 sheets per team)
- Tape (any kind works)
- Small weights: coins, washers, or books
- Ruler (optional, for measuring span)
Setup & Instructions:
- Divide students into teams of 2-3
- Challenge: "Build a bridge that spans 12 inches and holds the most weight"
- Give teams 20 minutes to design and build
- Test each bridge by adding weights until it fails
- Debrief: "What worked? What failed? What would you change?"
Time Breakdown:
- Introduction: 3 minutes
- Building: 20 minutes
- Testing: 10 minutes
- Reflection: 5 minutes
- Cleanup: 5 minutes
- Total: 43 minutes (fits one class period)
Learning Standards Alignment: This addresses engineering design standards (NGSS K-2-ETS1, 3-5-ETS1) and builds critical thinking about how shapes and materials affect strength.
Why It Works: Paper bridge challenges work because failure is immediate and visible.
Classroom Management Tip: Set a clear "testing zone" away from other work. Weights can scatter, and that's part of the learning, but containing the mess makes cleanup easier.
Activity 2: Lemon Battery Circuit Experiment
A lemon battery is a simple electrochemistry project where students use lemons, metal strips, and wire to generate small electrical current, making electricity tangible.
What You'll Need:
- Fresh lemons (1 per team, or 2-3 for a class demo)
- Zinc strips (galvanized nails work, or penny nails)
- Copper strips (pennies, copper wire, or copper foil)
- Wire or alligator clip leads
- Small LED or multimeter (optional, to measure voltage)
- Tape
Setup & Instructions:
- Insert one zinc strip and one copper strip into each lemon, about 2 inches apart
- Connect the zinc from one lemon to the copper of another with wire
- Measure voltage with a multimeter (about 0.9V per lemon)
- Connect 3-4 lemons in series to power a small LED
- Ask: "Why does this work? What's happening inside the lemon?"
Time Breakdown:
- Introduction to circuits: 5 minutes
- Setup and assembly: 10 minutes
- Testing and measurement: 10 minutes
- Reflection and troubleshooting: 5 minutes
- Cleanup: 5 minutes
- Total: 35 minutes
Learning Standards Alignment: This addresses NGSS standards for energy transfer (2-PS1, 3-PS2) and builds understanding of circuits without a traditional battery.
Why It Works: Lemon batteries work because they're surprising.
Common Troubleshooting: If the LED doesn't light, check that the metal strips aren't touching inside the lemon (they shouldn't be).
Activity 3: Homemade Slime Chemistry Project
Slime is a polymer chemistry project that teaches cross-linking, viscosity, and non-Newtonian fluids through direct manipulation and observation.
What You'll Need:
- White school glue (4 oz per batch)
- Borax powder (1 tablespoon per batch) or liquid starch
- Water
- Food coloring (optional)
- Measuring spoons and cups
- Mixing bowls
- Spoons for stirring
Setup & Instructions:
- Mix 4 oz glue with 1/2 cup water and food coloring in a bowl
- In a separate bowl, dissolve 1 tablespoon borax in 1 cup warm water
- Pour borax solution slowly into glue mixture while stirring
- Slime will form immediately, stir until it comes together
- Knead by hand until it reaches desired consistency
- Store in sealed containers
Time Breakdown:
- Introduction to polymers: 5 minutes
- Measuring and mixing: 10 minutes
- Observation and play: 10 minutes
- Cleanup: 10 minutes
- Total: 35 minutes
Learning Standards Alignment: This demonstrates polymer chemistry and non-Newtonian fluid behavior (NGSS 2-PS1, 5-PS1). Students observe two liquids combine into something with entirely different properties.
Safety Note: Borax is safe in small quantities, but ensure students wash hands after and avoid touching faces.
Activity 4: Paper Helicopter Drop Test
What You'll Need:
- 8.5" x 11" paper (1 sheet per helicopter)
- Scissors
- Tape (optional, for adjustments)
- Stopwatch or phone timer
- Measuring tape (optional)
Setup & Instructions:
- Fold paper according to standard paper helicopter template (fold in half lengthwise, cut two wings, fold down wings, fold up bottom flap, add paper clip to weight it)
- Drop from a consistent height (table, chair, or marked height on wall)
- Time how long it takes to fall
- Test variations: longer wings, shorter wings, heavier weight, different drop heights
- Record results and discuss what changed
Time Breakdown:
- Instruction and folding: 10 minutes
- Testing baseline: 5 minutes
- Testing variations: 15 minutes
- Analysis and discussion: 5 minutes
- Cleanup: 2 minutes
- Total: 37 minutes
Learning Standards Alignment: This addresses physics standards for motion and forces (NGSS K-PS2, 1-PS4) and introduces the scientific method through hands-on experimentation.
Why It Works: Paper helicopters are quick wins. Every student succeeds in building one, and the physics is visible as it spins and falls.
Extension: Have students predict what will happen before testing each variation. This builds hypothesis-testing skills and engages critical thinking before they see the result.
Activity 5: Baking Soda Volcano Reaction
A baking soda volcano is a classic acid-base reaction that produces carbon dioxide gas, creating visible bubbling.
What You'll Need:
- Baking soda (2-3 tablespoons)
- Vinegar (1/2 cup)
- Food coloring (optional)
- Dish soap (1 tablespoon, optional, for more foam)
- Small cup or container
- Tray or shallow pan (to contain mess)
- Spoon
Setup & Instructions:
- Place cup on a tray
- Fill cup halfway with baking soda
- Add a few drops of food coloring and dish soap
- Pour vinegar into cup quickly
- Watch the reaction foam and overflow
- Discuss: "What happened? Where did the bubbles come from?"
Time Breakdown:
- Setup: 5 minutes
- Reaction: 2 minutes
- Observation and discussion: 5 minutes
- Cleanup: 8 minutes
- Total: 20 minutes
Learning Standards Alignment: This demonstrates acid-base reactions and gas production (NGSS K-PS1, 1-PS1). Students observe a chemical change and see evidence of a new substance (carbon dioxide gas).
Why It Works: Volcanoes work because the reaction is dramatic and immediate.
Safety Tip: Vinegar and baking soda are completely safe. The reaction is vigorous but not dangerous. Contain it on a tray to minimize cleanup.
Activity 6: Density Tower with Household Liquids
What You'll Need:
- Tall clear glass or plastic cup
- Honey (densest)
- Dish soap
- Water
- Vegetable oil
- Rubbing alcohol (least dense)
- Food coloring (optional, to color each layer)
- Spoon or pipette for layering
Setup & Instructions:
- Pour honey into the bottom of the cup (about 1 inch)
- Slowly pour dish soap down the side of the cup (don't mix with honey)
- Add water the same way
- Add vegetable oil
- Carefully pour rubbing alcohol on top
- Observe the distinct layers
- Drop small objects (beads, pebbles, cork) and predict where they'll stop
Time Breakdown:
- Introduction to density: 5 minutes
- Layering liquids: 10 minutes
- Testing and observation: 10 minutes
- Discussion: 5 minutes
- Cleanup: 5 minutes
- Total: 35 minutes
Learning Standards Alignment: This addresses density concepts (NGSS 2-PS1, 5-PS1) and builds observation skills.
Why It Works: Density towers are visually striking and memorable. When students drop objects and watch them sink to their density level, the concept stops being abstract.
Troubleshooting: If layers mix, pour more slowly or use a spoon to guide the liquid down the side of the cup.
Activity 7: Simple Bridge from Straws
A straw bridge is an engineering challenge where students build a bridge span using plastic straws, tape, and minimal materials, teaching structural design and problem-solving at extremely low cost.
What You'll Need:
- Plastic straws (20-30 per team)
- Tape
- Small weights or books for testing
- Two chairs or stacks of books to span the bridge between
Setup & Instructions:
- Challenge: "Build a bridge from straws that spans 18 inches and holds weight"
- Teams design and build using only straws and tape
- Test the bridge by adding weights until it fails
- Discuss: "Why did it fail there? How would you redesign it?"
Time Breakdown:
- Introduction: 3 minutes
- Design and building: 20 minutes
- Testing: 10 minutes
- Reflection: 5 minutes
- Cleanup: 3 minutes
- Total: 41 minutes
Learning Standards Alignment: This addresses engineering design standards (NGSS K-2-ETS1, 3-5-ETS1) and builds understanding of structural stability and load distribution.
Why It Works: Straw bridges are engaging because the constraint is simple (only straws and tape) but the solution requires thinking. Students experiment with triangles for strength, layered straws for support, or truss designs.
Bringing These Activities Into Your Classroom
These seven low budget STEM activities share common strengths: quick setup, materials most classrooms already have, and real learning outcomes.
Rotating through these activities creates a rhythm where students anticipate hands-on learning days.
To deepen the impact of hands-on STEM experiences like these, consider pairing them with digital tools that build coding and problem-solving skills year-round. CodeAlgo Academy offers a standards-aligned platform where students apply the same critical thinking and design mindset to coding and math challenges. The platform uses game-based learning to keep students engaged while building measurable skills in problem-solving, logical reasoning, and computational thinking, the same skills they practice in activities like bridge engineering and circuit design.
Research shows that hands-on STEM experiences combined with digital learning tools create stronger retention and transfer of skills than either approach alone.
Educators who've implemented this combination say the activities feel connected rather than separate.
Start with one or two of these activities this month. Observe what your students learn and how they respond.
Frequently Asked Questions
What are some low-cost STEM activities for the classroom?
The seven activities in this guide, paper bridges, lemon batteries, slime, paper helicopters, volcanoes, density towers, and catapults, all use household materials like paper, lemons, baking soda, vinegar, and recycled containers. Most cost under $2 per student. These hands-on projects build critical thinking and problem-solving while keeping your budget intact, making them ideal for schools with limited resources seeking to deliver real STEM learning.
How can teachers teach problem-solving through STEM activities?
Frame each activity as a challenge with success criteria: 'Build a bridge that holds 5 kg' or 'Design a catapult that launches accurately.' Have students predict outcomes before testing, observe what happens, and adjust their approach. Ask reflection questions like 'What worked?' and 'What would you change?' This structured approach transforms simple experiments into classroom problem-solving activities for kids that develop critical thinking and creativity alongside hands-on learning.
How do you make a STEM activity engaging for different grade levels?
Adjust complexity and independence. Elementary students benefit from guided, step-by-step instructions and teacher demonstrations. Middle school students can design their own bridges or catapults with minimal guidance, compete on performance metrics, or predict and explain chemical reactions. Quick STEM activities for middle school work best when students have choice in approach. Differentiate by providing advanced challenges (add constraints, increase difficulty) and simplified versions (pre-cut materials, explicit instructions) so all learners engage at their level.
What everyday materials can be used for classroom STEM projects?
Paper, straws, popsicle sticks, tape, scissors, lemons, baking soda, vinegar, food coloring, oil, water, salt, sugar, recycled bottles, containers, and coins are your foundation. Ask families to contribute recyclables like plastic cups, egg cartons, and paper tubes. These simple supplies support engineering, chemistry, and physics projects. Low-prep STEM activities for teachers rely on materials already in classrooms or homes, eliminating procurement barriers and making hands-on STEM accessible to every school budget.
How can you adapt a STEM activity for a large class?
Run activities in rotating stations or small groups of 4-5 students. Assign roles: builder, tester, recorder, presenter. Use batch materials prep to save time. For demonstrations like volcanoes, conduct one large version while groups complete smaller versions simultaneously. Pre-portion materials into bags. Stagger cleanup. These strategies keep easy classroom STEM projects manageable while maintaining engagement and ensuring every student participates actively rather than watching passively.